How to Clone Your WordPress Site for Testing Without a Plugin
 ajith
ajith
 June 25, 2025


 ajith
June 25, 2025
ajith
June 25, 2025
Cloning your WordPress website is useful when you want to test new themes, plugins, or updates without risking your live site. While plugins can make cloning easier, not everyone wants to rely on them especially if a plugin is the reason for errors or you want full control.
In this article, we’ll show you how to manually clone your WordPress site using only cPanel tools, step by step. No plugins, no third-party services just what’s already available in your hosting account.
To test a new theme before applying it live
To troubleshoot plugin conflicts in a safe environment
To develop a new feature without affecting visitors
To create a staging version for training or experimentation
Cloning a site into a subdomain like test.yourdomain.com helps you keep things separate.
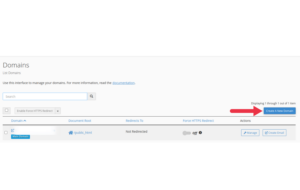
Log in to cPanel
Go to Domains section

Click Create A New Domain
Enter your subdomain (e.g., blog.yourdomain.com)
Ensure “Share Document Root” is unchecked
cPanel will auto-assign a document root like /public_html/blog
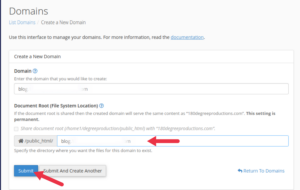
This folder is where your cloned site will live.
Now you’ll duplicate your WordPress files into the new subdomain or folder.
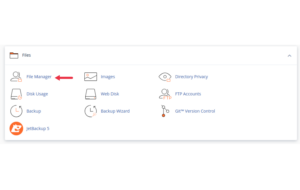
In cPanel, open File Manager
Go to /public_html/ (or wherever your current site is located)
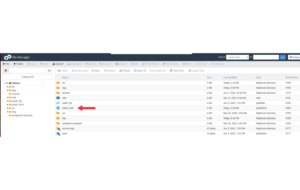
Select all WordPress files and folders
Click Copy
In the popup, set the destination as /public_html/test/ (or the subdomain folder you created)
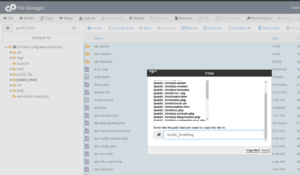
Wait for the copy to finish
Your new folder should now contain a duplicate of your entire WordPress installation.
You’ll now export the database associated with your current site.
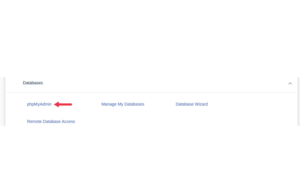
Go back to cPanel
Open phpMyAdmin
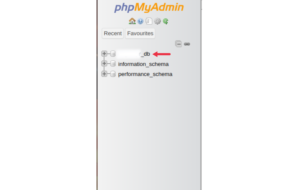
Select your live WordPress database (from the left sidebar)
Click the Export tab on top
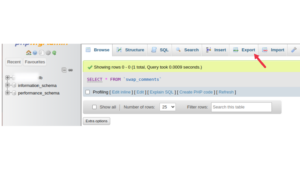
Choose Quick export method and format as SQL
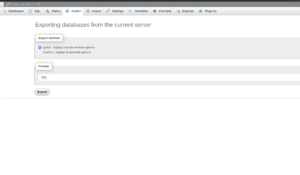
Click Go to download the .sql file
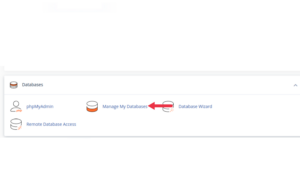
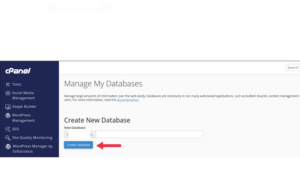
You need a new database for the cloned site to function separately.
In cPanel, go to MySQL® Databases
Create a new database (e.g., test_wpdb)
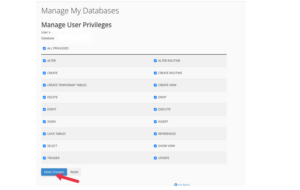
Create a new MySQL user

Assign the user to the new database and give All Privileges
Note down the:
New database name
Username
Password
You’ll need these in the next step.
Now, you’ll populate the new database with the exported .sql file.
Open phpMyAdmin again
Click the new database you created
Go to the Import tab
Choose the .sql file you exported earlier
Click Go
After a few seconds, your new database will contain all the data from your original site.
Now, make sure your cloned files use the new database.
In File Manager, go to your cloned site folder (/public_html/test/)
Find the file wp-config.php
Right-click > Edit
Update the following lines:
Save changes
Now your cloned site is connected to its own database.
By default, WordPress will still reference the original site URL (e.g., yourdomain.com). You can fix this by updating the URL in the cloned database.
Open phpMyAdmin > new database
Go to the wp_options table
Change the values for:
siteurl
home
Replace with your cloned site’s URL (e.g., https://test.yourdomain.com)
Visit the URL of your cloned site (e.g., https://test.yourdomain.com).
You should see an exact copy of your live site but in a safe testing environment.
Since it’s only for testing, you might not want it to be visible publicly.
Use cPanel’s Directory Privacy (password protection):
Go to File Manager
Right-click the test folder
Choose Password Protect
Set a username and password
Cloning your WordPress site manually using cPanel is completely doable even for non-technical users and doesn’t require plugins. With a few careful steps, you can test updates, troubleshoot issues, or redesign without any risk to your main website.