How to Use SSH Access in cPanel (Even as a Beginner)
 ajith
ajith
 June 26, 2025


 ajith
June 26, 2025
ajith
June 26, 2025
Most people manage their websites through the cPanel interface. But sometimes, using the command line can offer more control, especially when uploading files, running maintenance tasks, or troubleshooting errors.
That’s where SSH (Secure Shell) access comes in.
In this article, we’ll walk you through how to enable and use SSH access in your cPanel hosting account even if you’ve never used a terminal before.
SSH stands for Secure Shell. It allows you to access your hosting account’s files and run commands using a text-based interface.
Think of it like a “remote keyboard” into your hosting space. You can:
View and manage files
Check logs
Run WordPress commands (via WP-CLI)
Fix file permission issues
Unzip or move large folders quickly
Yes SSH uses encryption to make sure no one can intercept your login or data. It’s much more secure than traditional FTP when used correctly.
But because it’s powerful, most hosting providers disable it by default until you enable it manually.
Log in to cPanel
Use the credentials provided by your host.
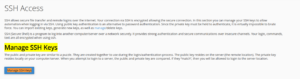
Find the “Terminal” or “SSH Access” Option

Search for “SSH Access” or navigate to the Security section.
If you don’t see this, your hosting plan might not include SSH. Contact your hosting support to request it.
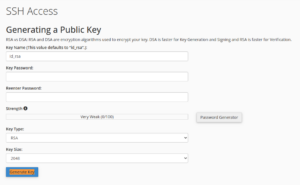
Manage SSH Keys
Click Manage SSH Keys (or Generate a New Key if none exists).
In the SSH Access section, click Manage SSH Keys.
Click Generate a New Key:

Choose a key name or leave it default
Set a secure password (optional)
Click Generate Key
Authorize the key by clicking Manage > Authorize next to the key you just generated.
You can now connect to your hosting account using a terminal tool. Depending on your operating system:
Use PuTTY — a free terminal client.
Download and install PuTTY
Enter your domain name or server IP under Host Name
Port: 22
Click Open
Log in with your cPanel username and password
These systems have a terminal built-in. Just open Terminal and type:
Replace username with your cPanel username and yourdomain.com with your domain or server IP.
Once you’re connected, here are some useful commands:
| Command | What It Does |
|---|---|
ls |
Lists files and folders |
cd foldername |
Change directory |
pwd |
Shows current directory path |
rm filename |
Delete a file |
mkdir newfolder |
Creates a new folder |
unzip file.zip |
Unzips a .zip file |
du -sh * |
Shows disk usage for folders |
wp plugin list |
(If WP-CLI is enabled) List all plugins |
Don’t delete files you don’t recognize
Avoid changing permissions unless you understand what they do
Don’t run random commands copied from the internet
If in doubt, ask your host before using commands that modify files or folders.
If your host supports WP-CLI, you can manage WordPress from the terminal:
Examples:
This is useful if you can’t access the WordPress admin panel due to errors or conflicts.
“Connection refused” – Port 22 might be blocked by your firewall or SSH not enabled
“Permission denied” – Wrong username or password
Key not working? – Check if it’s authorized in the SSH Keys section in cPanel
Still having issues? Contact your host and confirm:
SSH is enabled
Your IP is not blocked by the firewall
SSH might seem intimidating at first, but it becomes incredibly useful once you understand the basics. From running quick commands to fixing broken sites, SSH gives you a reliable toolset especially when you can’t fix things through the regular cPanel interface.
Start small, stick to safe commands, and you’ll quickly build confidence using the terminal.