How to Recover WordPress Admin Access If You Deleted Your User (via cPanel)
 ajith
ajith
 July 3, 2025


 ajith
July 3, 2025
ajith
July 3, 2025
Accidentally deleted your WordPress admin account? Don’t worry it happens more often than you think. Whether you were cleaning up old users or troubleshooting roles, losing access to your admin dashboard can be stressful.
But as long as your website files and database are intact, you can easily create a new admin user using phpMyAdmin in cPanel.
In this article, we’ll walk you through exactly how to recover access no need for a plugin or command line.
Start by logging into your hosting account’s cPanel.
Your hosting provider should give you a direct link like:https://yourdomain.com/cpanel
Enter your cPanel username and password
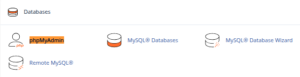
Once inside, go to the Databases section and click on phpMyAdmin.
Inside phpMyAdmin:
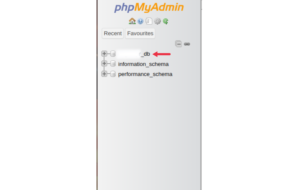
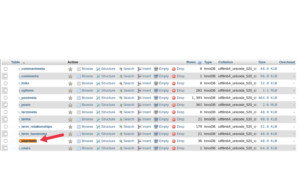
On the left, click the name of your WordPress database (e.g., wp12345)
Find and click the table ending in _users usually wp_users unless your prefix is customized
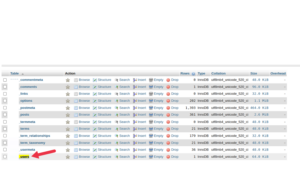
This table contains all registered WordPress users.
Click the Insert tab at the top to create a new user record.
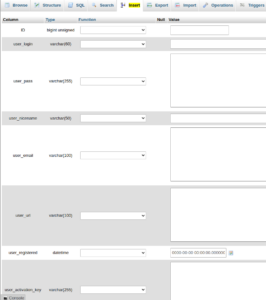
Fill in the fields as follows:
| Field | Value |
|---|---|
| ID | Leave blank (auto-increment) |
| user_login | newadmin (or any username you want) |
| user_pass | Choose “MD5” in the Function dropdown, then enter a secure password |
| user_nicename | Any name you prefer (e.g., Admin User) |
| user_email | Your email address (e.g., you@example.com) |
| user_url | Optional — can leave blank |
| user_registered | Current date/time (YYYY-MM-DD HH:MM:SS) |
| user_activation_key | Leave blank |
| user_status | 0 |
| display_name | Your display name (e.g., Admin) |
Then click Go at the bottom to save.
Now, let’s make this new user an administrator.
Go back to the database list and click on the table ending in _usermeta (e.g., wp_usermeta)
Click the Insert tab

You’ll need to insert two new rows:
| Field | Value |
|---|---|
| umeta_id | Leave blank |
| user_id | ID of the new user (check wp_users for this) |
| meta_key | wp_capabilities |
| meta_value | a:1:{s:13:"administrator";b:1;} |
| Field | Value |
|---|---|
| umeta_id | Leave blank |
| user_id | Same user ID |
| meta_key | wp_user_level |
| meta_value | 10 |
Click Go after each insertion.
Tip: If your database prefix is not wp_, use the correct prefix for meta_key (e.g., xyz_capabilities).
Now that the new admin user is created:
Visit your WordPress login page:https://yourdomain.com/wp-login.php
Enter your new admin username and password
You should now have full access to your dashboard!
Once you regain access:
Double-check your list of users
Delete any inactive or test accounts you no longer need
Update your new admin’s email and password via WordPress for security
Don’t delete your only admin always create a backup admin before removing users
Regularly back up both your files and database
Use cPanel’s Backup Wizard or Softaculous backup options
Keep phpMyAdmin access secure (change cPanel passwords periodically)
Losing access to your WordPress admin panel may seem scary, but it’s entirely recoverable especially when you have access to cPanel. By using phpMyAdmin, you can create a new admin user in just a few clicks and restore full control of your website.
If you get stuck or feel unsure, don’t hesitate to reach out to your hosting provider’s support team they can help validate user roles or walk you through database steps safely.