How to Fix “Allowed Memory Size Exhausted” Error Without Touching Code (via cPanel)
 ajith
ajith
 June 26, 2025


 ajith
June 26, 2025
ajith
June 26, 2025
If you’ve encountered a scary white screen or the message Fatal error: Allowed memory size of x bytes exhausted, you’re not alone. This is one of the most common WordPress errors and thankfully, you don’t need to touch code to fix it.
In this article, we’ll walk you through how to fix the “Allowed Memory Size Exhausted” error using only your cPanel account. No need to open files manually or edit PHP code directly.
When your WordPress website tries to use more memory than what the server allows for PHP scripts, the server stops the process and throws this error.
You might see:
This means your memory limit is too low and WordPress, a plugin, or theme is trying to use more memory than it’s allowed.
Poorly optimized themes or plugins
Heavy WooCommerce or page builder operations
Multiple high-memory plugins running together
Large media or database imports
Low default PHP memory limit (like 32M or 64M)
Here are multiple ways to increase your PHP memory limit safely from cPanel.
Log in to your cPanel account
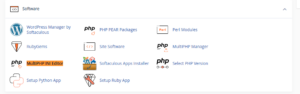
Scroll down to the “Software” section
Click on MultiPHP INI Editor
Under Basic Mode, choose the domain where WordPress is installed
Look for the setting: memory_limit
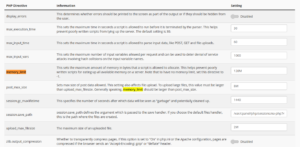
Increase it to something like:
or
depending on your hosting plan
Click Apply
Done! This is the safest and easiest method to increase memory.
Some hosting panels have this instead of MultiPHP:
In cPanel, go to Select PHP Version under the Software section
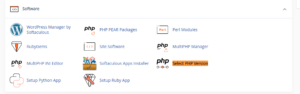
Click Options or Switch to PHP Options

Find memory_limit
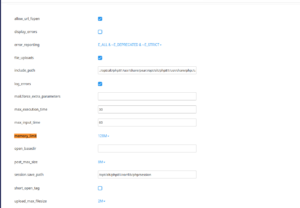
Click the value and select a higher one (e.g., 256M)
Changes are saved automatically
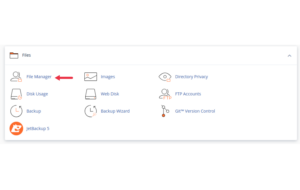
If your cPanel doesn’t offer the tools above, you can still modify settings safely using File Manager.
Go to File Manager from the cPanel dashboard
Navigate to your WordPress root directory (public_html/)
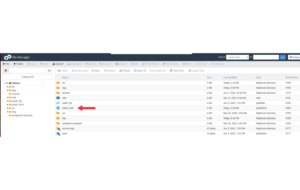
Look for the file: .htaccess or php.ini
php.ini file:Right-click and Edit
Add this line or modify if it exists:
php.ini, create one:Click + File
Name it: php.ini
Edit the file and add:
.htaccess:Edit .htaccess and add this at the top:
Important: Always back up files before editing. Only use .htaccess if you’re not on LiteSpeed/NGINX servers that ignore PHP values in .htaccess.
Go back to your website
Refresh the page
If the error is gone, the new memory limit is active
Still seeing the error? Try increasing the limit further to 512M or disable heavy plugins temporarily to isolate the cause.
Use a plugin like Query Monitor (after fixing the error) to see what’s consuming memory in the admin area.
If none of the above methods work:
Clear browser cache and server cache (if you use a caching plugin)
Contact your hosting support and ask them to increase the memory limit manually
Consider removing recently added plugins or themes to test for conflicts
The “Allowed Memory Size Exhausted” error doesn’t mean your site is broken just that it hit a ceiling. With cPanel’s tools, you can increase that ceiling safely without ever touching raw code.
By following this article, even beginners can fix this issue in minutes.