How to Disable Directory Indexing for Better Security in cPanel
 ajith
ajith
 July 2, 2025


 ajith
July 2, 2025
ajith
July 2, 2025
Have you ever typed a URL like yourdomain.com/files/ and suddenly seen a list of all your images, PDFs, or scripts? That’s directory indexing, and while it might seem harmless, it can pose a serious security and privacy risk for your website.
In this article, we’ll explain what directory indexing is, why it should be disabled, and how you can easily do it from your cPanel no coding or technical background needed.
Directory indexing allows visitors to view the contents of a folder on your website if there’s no index file (like index.html or index.php) present. Instead of showing a 403 Forbidden error or redirecting, the server displays a list of all files in that directory.
Exposes sensitive files: Visitors may see configuration files, backups, or unlinked media.
Reveals site structure: Hackers can map your folder setup and look for vulnerable scripts.
Unprofessional appearance: A raw directory list looks messy and unsecure to visitors.
Disabling directory indexing prevents your website from listing directory contents if no index file is found. Instead, users will get a 403 Forbidden error, keeping your files hidden.
The good news? You can disable it directly from cPanel’s Indexes tool here’s how.
Visit yourdomain.com/cpanel
Enter your cPanel username and password
You’ll land on the cPanel dashboard
Scroll down to the Advanced section
Click on Indexes

This tool controls how directories are displayed when no index file is found.
You’ll now see a directory tree of your site’s folders
Click the folder icon next to public_html to expand it
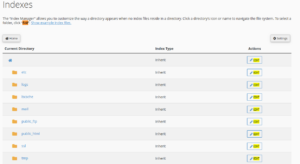
Navigate to the directory you want to secure
Click on the folder name (not the icon) to edit its settings
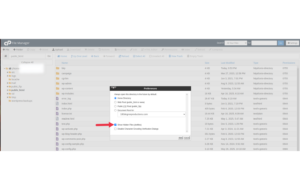
You’ll be given four options:
Default System Setting
No Indexing (what we want)
Standard Indexing (filename only)
Fancy Indexing (filename + details)
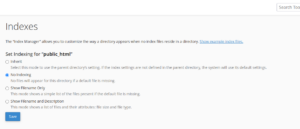
Select “No Indexing” and click Save.
Repeat this for other folders you want to protect.
When someone visits a folder without an index.html or index.php, instead of showing a file list, they’ll get a 403 Forbidden error.
This means your content remains private and secure even if a plugin or CMS leaves a folder accessible.
If you’re comfortable editing the .htaccess file, you can disable indexing site-wide:
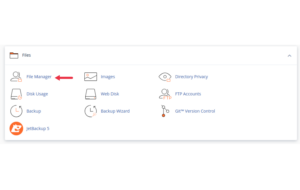
Open File Manager in cPanel
Navigate to public_html
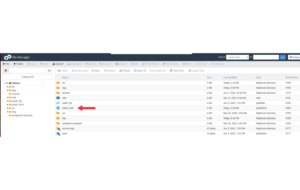
Click Settings (top-right) > Enable “Show Hidden Files”
Right-click on .htaccess > Edit
Add the following line at the top:
Options -Indexes
Save and close
Be careful not to remove any existing rules if your site uses plugins like WordPress.
Here are a few things to check:
Make sure you applied No Indexing to the correct folder
Clear your browser cache
Confirm there’s no conflicting .htaccess rule allowing indexing
Ensure your hosting provider doesn’t override index settings globally (rare)
You should disable indexing for:
Any public-facing folder that contains files not meant to be browsed
Uploads or download directories without an index file
Staging, test, or backup folders
Old CMS installations or outdated scripts
Disabling directory indexing is a simple yet powerful step in securing your website. It ensures that only the content you want visible is accessible and everything else stays private.
With just a few clicks in cPanel, you can block prying eyes from browsing your site’s folders and reduce the risk of exposing sensitive data. Even if you’re not a techie, this is one security tweak worth doing today.
