How to Configure SPF, DKIM, and DMARC Records via cPanel DNS
 ajith
ajith
 June 24, 2025


 ajith
June 24, 2025
ajith
June 24, 2025
Ensure Better Email Delivery and Prevent Spoofing from Your Hosting Dashboard
Email deliverability is a common concern among website owners. Whether you’re running a small business website or sending newsletters, having your emails land in your recipient’s inbox and not in spam is crucial.
That’s where SPF, DKIM, and DMARC records come in. These DNS-based email authentication mechanisms help mail servers determine whether your domain is authorized to send emails, reducing the chances of being flagged as spam or being spoofed by scammers.
In this article, you’ll learn how to set up and manage SPF, DKIM, and DMARC records directly from cPanel, step by step without needing external tools or technical expertise.
Let’s start with a quick overview:
SPF defines which servers are allowed to send emails on behalf of your domain. It helps recipient mail servers verify whether an incoming email from your domain is legitimate.
Example record:
DKIM adds a cryptographic signature to your outgoing emails. This signature helps the recipient verify that the email wasn’t altered during transit and confirms its origin.
Example DKIM record:
DMARC uses both SPF and DKIM results to determine what to do with suspicious emails. It also allows domain owners to receive reports about failed authentication attempts.
Example DMARC record:
Let’s go through each record setup using cPanel’s DNS editor.
Access your cPanel through your hosting provider.
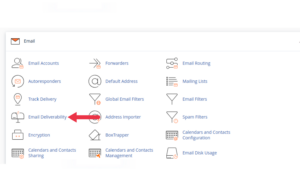
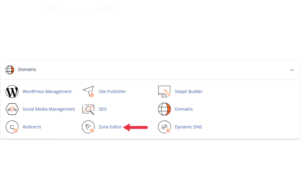
Look for the “Email Deliverability” or “Zone Editor” under the Domains or Email section.
Most cPanel accounts have a built-in Email Deliverability feature:
Go to Email Deliverability
Find your domain in the list and click Manage
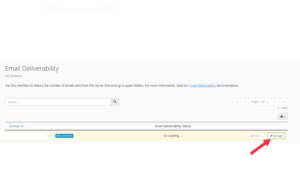
If SPF or DKIM is not enabled, you’ll see options to Repair or Install
Click Repair or Install Suggested Record for both SPF and DKIM
These records will be automatically added to your DNS zone and contain necessary values based on your hosting email service.
If you’re using external email services (like Mailchimp, Google Workspace, or a CRM), you may need to modify your SPF record.
Go to Zone Editor > Click Manage next to your domain

Filter by TXT records
Look for a record starting with v=spf1
Edit it to include your authorized email services:
Avoid adding multiple SPF records — only one SPF record per domain is allowed.
If you’ve already enabled DKIM using the Email Deliverability tool, it’s done for you.
To verify:
Go to Zone Editor > Manage
Look for a TXT record that starts with:
If you’re using an external mail provider that requires DKIM (like Mailchimp or SendGrid), they’ll give you a TXT name and value to add:
Name: selector1._domainkey.yourdomain.com
Value: Provided by the mail provider (long public key string)
Click Add Record, choose TXT, and paste in the given values.
Unlike SPF and DKIM, DMARC isn’t generated automatically in cPanel you must create it manually.
Go to Zone Editor > Manage
Click Add Record > Select TXT
Enter the following details:
Name: _dmarc.yourdomain.com
TTL: 14400 (or leave default)
TXT Data:
Here’s what each tag means:
v=DMARC1: DMARC version
p=quarantine: Tells recipient to quarantine suspicious emails
rua: Email where DMARC reports will be sent
You can also use p=none (monitor only) or p=reject (strictest level).
DNS changes can take up to 24–48 hours to propagate globally. To test:
Use tools like MXToolbox or dmarcian.com
Check your domain for active SPF, DKIM, and DMARC records
Review email headers from test emails to confirm successful authentication
| Issue | Fix |
|---|---|
| Multiple SPF records | Combine into one |
| DKIM record rejected | Ensure no line breaks or extra spaces |
| DMARC not showing | Ensure TXT name is _dmarc.yourdomain.com |
| Reports not arriving | Make sure your rua email is active and valid |
Better Deliverability: Your emails are more likely to land in inboxes
Spoofing Protection: Prevent scammers from sending fake emails using your domain
Reputation Monitoring: With DMARC reports, you can spot abuse early
Setting up SPF, DKIM, and DMARC may seem technical, but cPanel makes it easier than ever. Once you’ve configured these records, your emails will not only appear more legitimate to recipient servers but also be better protected from spoofing and phishing attempts.
If you ever feel stuck, your hosting provider can help validate your DNS entries. But once you’ve done it once, you’ll find it’s a routine step for any professional email setup.