How to Disable All WordPress Plugins at Once via cPanel
 ajith
ajith
 July 2, 2025


 ajith
July 2, 2025
ajith
July 2, 2025
WordPress plugins are a great way to extend your site’s functionality but sometimes they break things. Maybe after a plugin update your site shows a white screen, crashes, or throws a fatal error. Or maybe you’re locked out of your WordPress admin dashboard entirely.
In such situations, the fastest fix is to disable all plugins at once. But how do you do that if you can’t log in? Thankfully, if your site is hosted with cPanel, you can easily disable every plugin manually without touching any code or using FTP.
This article will walk you through the safe, beginner-friendly method of disabling all plugins via cPanel’s File Manager and phpMyAdmin.
Here are some common situations:
You updated a plugin and your site stopped working.
You see a “critical error on this website” message.
The WordPress dashboard is blank or inaccessible.
You’re troubleshooting performance or compatibility issues.
Disabling all plugins resets your site to a safe baseline so you can re-enable them one by one.
This is the fastest and safest way. WordPress automatically deactivates plugins if their folders are missing or renamed.
Log in to cPanel
Your hosting provider usually gives you the cPanel login link. Log in with your credentials.
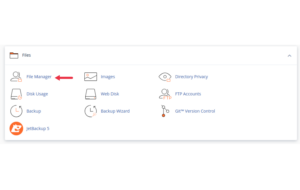
Go to File Manager
Under the “Files” section, click on File Manager.
Navigate to Your WordPress Directory
Open the folder where your WordPress site is installed. It’s usually in public_html/ or a subdirectory.
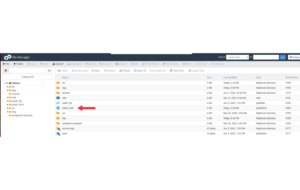
Open wp-content Folder
Double-click on the wp-content folder.
![]()
Find the plugins Folder
Inside, you’ll see a folder named plugins.

Rename the Folder
Right-click plugins and choose Rename. Change the name to something like plugins-old.
Check Your Website
Refresh your website or login page. If the error was plugin-related, your site should now load properly.
Tip: After fixing the issue, rename the folder back to
pluginsand re-activate plugins one at a time from the WordPress admin dashboard to identify the culprit.
If you want to disable all plugins but don’t want to rename folders, you can use phpMyAdmin to change the plugin status directly in the database.
Log in to cPanel
Navigate to the Databases section and click phpMyAdmin.

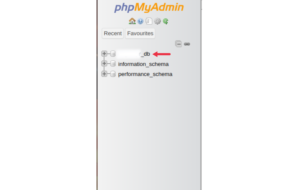
Select the Correct Database
On the left-hand side, click the database that your WordPress site uses. If unsure, check the wp-config.php file for this line:
Find the wp_options Table
Scroll down and click on wp_options (your prefix may vary, e.g., wp99_options).
Locate the active_plugins Row
Look for a row where the option_name is active_plugins (usually on page 2–3).
Edit the Row
Click Edit next to it.
Clear the Option Value
In the option_value field, delete everything so it becomes empty:
Click Go to Save
This disables all active plugins.
This method is especially useful if renaming folders didn’t work or you need more control.
WordPress will act as if no plugins are active.
Your themes, settings, and content remain untouched.
You can now log in to the dashboard, go to Plugins, and reactivate plugins one at a time to identify the one causing issues.
Always take a full backup before modifying anything, especially in phpMyAdmin.
Never delete plugins unless you’re sure deactivation is often enough.
Rename plugins instead of deleting to restore them quickly if needed.
Disabling all WordPress plugins via cPanel is a powerful tool when your website is down or acting strange. Whether you’re a small business owner, blogger, or freelancer, knowing this quick fix can save you from panic and downtime.
If you’re ever stuck and not comfortable making these changes, don’t hesitate to contact your hosting provider’s support team for help.