How to Create Subdomains and Assign Them to a Folder in cPanel (Using the Domains Section)
 ajith
ajith
 June 21, 2025


 ajith
June 21, 2025
ajith
June 21, 2025
Creating subdomains is a great way to organize your website into different sections or projects. Whether you want to build a staging site, blog, landing page, or multilingual site like fr.yourdomain.com, subdomains help you structure it neatly under your main domain.
In older versions of cPanel, there was a separate Subdomains section. However, in modern cPanel versions, everything is managed under the Domains section which may seem confusing at first, but it’s actually more streamlined once you know how to use it.
This article will walk you through how to create a subdomain and assign it to a specific folder (document root) using the new Domains interface in cPanel.
A subdomain is a prefix added to your domain name, acting as a separate section of your website.
Examples:
blog.yourdomain.com for a blog
shop.yourdomain.com for an online store
test.yourdomain.com for a development or staging site
Subdomains function as standalone websites with their own files and structure even though they live under the same hosting account.
Go to your hosting provider’s cPanel login page, typically at:
https://yourdomain.com/cpanel
Enter your username and password to access the dashboard.
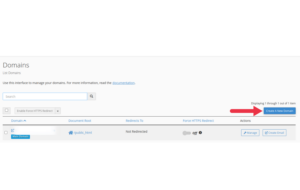
Scroll down or search for “Domains” using the cPanel search bar.

Click on the Domains icon.
Important: The old Subdomains tool has been merged into this new “Domains” section.
Once you’re in the Domains section:
Click the “Create A New Domain” button.
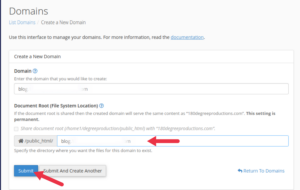
In the Domain field, enter your subdomain.
Example:
If your domain is yourdomain.com, you can enter blog.yourdomain.com.
cPanel will automatically detect that this is a subdomain of your main domain.
Below the domain field, you’ll see:
“Share document root with…” Uncheck this box.
Now cPanel will allow you to set a custom directory.
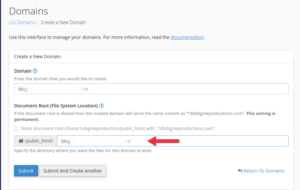
For example:
/home/yourusername/blog.yourdomain.com
You can change it to anything like:
This folder is where all files for that subdomain will be stored. It’s just like the public_html folder but specific to the subdomain.
Once everything looks correct, click the Submit button.
That’s it! Your subdomain is now created and pointing to the assigned folder.
To start using your subdomain, simply upload a website (like a new WordPress installation or an HTML project) into the subdomain’s root folder.
Go to File Manager in cPanel
Navigate to the folder you set for the subdomain (e.g., /public_html/blog)
Upload your files or install WordPress manually using Softaculous
Now, visiting blog.yourdomain.com will load whatever files are inside that folder.
| Issue | Solution |
|---|---|
| Subdomain shows a 404 error | Make sure files are uploaded to the correct document root |
| SSL not working on subdomain | Use AutoSSL in cPanel to install free SSL for the subdomain |
| Folder not accessible | Double-check that the folder permissions are set to 755 and files to 644 |
| Subdomain not resolving | Wait up to 1 hour for DNS to propagate (especially after DNS edits) |
staging.yourdomain.com: For testing updates
docs.yourdomain.com: Documentation
clientname.yourdomain.com: White-labeled client portal
event.yourdomain.com: For special campaigns
They all help keep your main site uncluttered while still under the same hosting plan.
Even though the Subdomains option no longer appears in cPanel, managing subdomains through the Domains section is just as easy and more flexible. You can now set up new environments for testing, client portals, or blogs without buying extra domains.
With just a few clicks, you can create subdomains, assign them to their own folders, and begin uploading your content all from cPanel.