How to Force HTTPS via .htaccess from cPanel
 ajith
ajith
 June 21, 2025


 ajith
June 21, 2025
ajith
June 21, 2025
If you’re running a website on cPanel hosting, securing your connection with HTTPS is one of the easiest yet most important steps you can take. HTTPS not only protects your visitors’ data with encryption, but also boosts SEO rankings and avoids “Not Secure” browser warnings.
The best way to force HTTPS on every page of your site is by updating your .htaccess file and you can do this directly from your cPanel dashboard, without needing advanced technical skills.
In this article, you’ll learn exactly how to do it safely, step by step.
Even if you’ve installed an SSL certificate, your website may still be accessible through both http:// and https://. That’s a problem because:
Users may land on the non-secure version
You might face SEO duplication issues
Login forms or contact pages may send data without encryption
By forcing HTTPS, you ensure all visitors are automatically redirected to the secure version of your site no matter what URL they use.
Start by accessing your hosting account and logging into cPanel. The URL typically looks like:
https://yourdomain.com/cpanel
Use the credentials provided by your hosting provider.
Once inside cPanel:
Scroll to the Files section
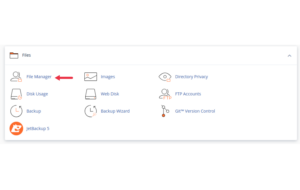
Click on File Manager
This opens a browser-based file editor for your entire website.
By default, .htaccess is a hidden file. To view it:
Click Settings in the top-right corner of File Manager

Check “Show Hidden Files (dotfiles)”
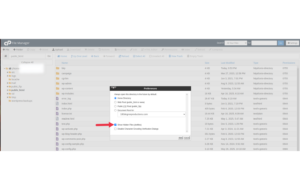
Click Save
Now you should see .htaccess in the public_html/ directory (or your domain’s root folder).
Before making any changes:
Right-click the .htaccess file
Click Download to save a local backup
This ensures you can recover your website in case something goes wrong.
Now, right-click .htaccess and choose Edit.
A new tab will open with a plain-text editor. Scroll to the top and insert the following code:
Explanation:
RewriteEngine On: Enables URL rewriting
RewriteCond %{HTTPS} off: Checks if the request is not using HTTPS
RewriteRule: Redirects all requests to HTTPS using a 301 (permanent) redirect
Make sure this goes above the WordPress permalink block if you have one.
Click Save Changes at the top-right of the editor.
Then open your website in a new browser window and try typing:
You should be redirected automatically to:
https://yourdomain.com
Test multiple internal pages as well to confirm everything is loading securely.
| Issue | Solution |
|---|---|
| Site not loading after update | Restore your .htaccess backup |
| Redirect loop (too many redirects) | You may already have HTTPS rules elsewhere (plugin, CMS) |
| HTTPS still not working | Ensure your SSL certificate is installed and valid |
For HTTPS to work, you must already have a valid SSL certificate installed.
To check:
In cPanel, go to SSL/TLS Status
Look for green padlocks next to your domain
If your domain doesn’t have an SSL installed, use AutoSSL or ask your host to enable Let’s Encrypt SSL (usually free).
Forcing HTTPS isn’t just a nice-to-have it’s a must-do for website security, SEO, and trust.
Thanks to cPanel’s File Manager and a few lines of .htaccess code, you can redirect all traffic to HTTPS in under 5 minutes. Just remember to back up before editing, and your site will be secure, professional, and fully optimized for modern browsers.