How to Create a MySQL Database and User in cPanel
 Samuel Lester
 June 14, 2025


 Samuel Lester
June 14, 2025
Samuel Lester
June 14, 2025
If you’re launching a website that uses WordPress, Joomla, Magento, or any other content management system, chances are you’ll need a MySQL database. Most web hosting services offer cPanel, which makes it easy to create and manage databases through a graphical interface no technical expertise required.
In this tutorial, you’ll learn how to create a MySQL database and user in cPanel and assign the necessary permissions to get your website running smoothly.
A MySQL database stores all the dynamic data for your website user accounts, blog posts, settings, etc. For instance:
WordPress uses MySQL to manage posts, pages, and user info.
eCommerce platforms use it to store product details and orders.
Web apps rely on databases for user authentication and session tracking.
So, before installing your CMS or application, a database must be set up correctly.
Access your hosting control panel by visiting:yourdomain.com/cpanel
Enter your cPanel username and password provided by your hosting company.
Once inside cPanel:
Scroll down to the Databases section.
Click on MySQL® Databases.

This is the main interface for creating and managing your MySQL databases and users.
Under the Create New Database section, enter a name for your database (e.g., mywebsite_db).
Click Create Database.
You’ll see a confirmation message like:
“Added the database yourcpaneluser_mywebsite_db.”

Note: cPanel automatically prefixes the database name with your cPanel username.
Now that the database is ready, you need a user to access it.
Scroll down to MySQL Users > Add New User.
Choose a username (e.g., myuser) and enter a strong password (you can use the Password Generator).
Click Create User.
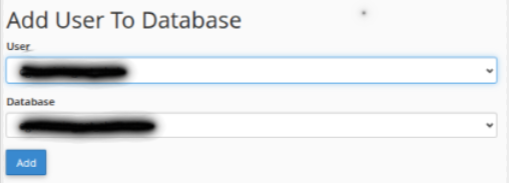
To allow the user to access and control the database:
Scroll to Add User to Database.
Select the newly created user and database from the dropdowns.
Click Add.
You’ll be taken to a permissions page.
Check All Privileges (recommended for WordPress and most CMS setups).
Click Make Changes.
That’s it! Your database and user are now connected.
When installing WordPress or another script, you’ll need the following details:
Database Name: yourcpaneluser_mywebsite_db
Database Username: yourcpaneluser_myuser
Password: The one you created
Make sure to store these in a safe place for future use.
Use strong passwords to prevent unauthorized access.
Limit privileges if you’re creating users for specific tasks (like read-only access).
Back up your databases regularly using phpMyAdmin or automated tools.
Delete unused databases and users to reduce clutter and improve security.
Setting up WordPress, Joomla, or Magento
Creating a custom PHP application with database interaction
Linking to external scripts or services that require MySQL access
Creating a MySQL database and user in cPanel is a straightforward task but an essential one for any dynamic website. By following the steps above, you can prepare your hosting environment for any CMS or custom application with ease.
Whether you’re launching a blog, an online store, or a client project, mastering this skill will save you time and help avoid configuration issues down the line.